The Self-Build Guide to The Build: 5. Finishing Touches

As we reach the conclusion of our Self-Build Guide to The Build, you should by now have a very clear idea what your finished home looks like. It’s almost completely decorated and the bathroom and kitchen are in place. It looks like a home, but there are several aspects – both inside and out – that need to be completed to put the finishing touches to your project.

As we reach the conclusion of our Self-Build Guide to The Build, you should by now have a very clear idea what your finished home looks like. It’s almost completely decorated and the bathroom and kitchen are in place. It looks like a home, but there are several aspects – both inside and out – that need to be completed to put the finishing touches to your project.

Inside story

One of the biggest changes to the property will be the arrival of power. The gas and electric will be connected. Everything – the boiler or cylinder – for example, will be fired up, tried and tested, to ensure it’s in full working order. This is very much a moment of truth, as the central heating and electrics will have been tested in isolation, but will not have necessarily received general, day-to-day usage. Showers, cookers and any plumbed-in freestanding items, such as washing machines and dishwashers, can also be tested for operation. Each of the trades that have installed services and utilities will have to submit official certificates to prove that all they have been tested and passed as being safe. This certification will mean the work is guaranteed to the highest British Standards for their respective industries.

Decors and details 

Another big addition to the interior decoration is finishing the paintwork, which you’ll have chosen to complement the spaces and décor. This is when your chosen colour schemes combine on a grand scale. You’ll see all the various components coming together. Some of the painting will just be ‘making good’. Other parts might include larger areas. There’s some joinery still to be installed, such as banisters and spindles to hardwood staircases, or vanity units, shelving and fitted wardrobes. Some of these may require painting to finish, while others may be stained or varnished. There may also be fixtures and fittings such as ironmongery to doors, hanging rails, feature walls, oak headboards, fireplaces and fixed mirrors to be added. All this takes time and it’s surprising that, although the building looks finished, each of these small details is a job in itself. 

Snagging list at finishing time

On a CB Homes project, once the interior is deemed finished according to the builder’s work schedule, the site manager, project manager, the sales team and finally the client will do their snagging walk throughs. This is simply to double-check that every single aspect of the project has been carried out to the agreed and expected highest possible standards.

CB Homes has very strict procedures in place at this snagging stage, to make sure nothing is missed – even down to testing every socket and radiator. Being absolutely thorough in this regard ensures we don’t miss any detail, no matter how small. If any items are raised by the client, they will be addressed via an itinerary of corrections that need to be made. This is known as a snagging list. Once our client is satisfied with the end results, the interior undergoes an extensive and meticulous deep clean so it is absolutely spotless.

Nearing the finishing line

During the building process, the outside of the property and the surrounding area will look like a working building site. Materials need to be stacked and stored. There may be site cabins, machinery and vehicles, and the ground may be a temporary hard standing or – depending on the time of year – quite muddy. Part of finishing the exterior will include fitting the final bits of drainage, which can include guttering and downpipes. There may be some external decoration to be painted too, such as fascia boards or window frames. If the property has been rendered or features timberwork, that may require painting or treating too. The whole exterior of the building is cleaned with a power washer, to get rid of any dust and debris, such as mortar spots or splashes.

Ground force for finishing touches

The exterior landscaping and approaches will also need to be addressed in this final stage. Outside features such as patios, boundary walls, fences, hedging, gardens and lawns will be installed. The same goes for whatever driveways and parking areas are required. If the property has special features, such as electric gates, they will need to be fitted and connected to power too. These exterior elements will likely have started during the second fix, but now it will all come together to a finish.

Finishing the final inspection

When the project has been completed, the final inspections are carried out with the building surveyor, local authority building inspector, and the warranty providers. The house will also be air tested, to make sure it fits in with building requirements for air tightness. This stage will effectively give the building a clean bill of health and hand it over to its new owners.

When all this is completed and the finishes, flourishes and final touches have been applied, the project is officially ready for you to move in and enjoy your new dream home.  

If you have always dreamed of building your own home, contact us to find out more about our complete turnkey solution for your self-build project.
The Self-Build Guide to The Build: 2. Substructure to Superstructure

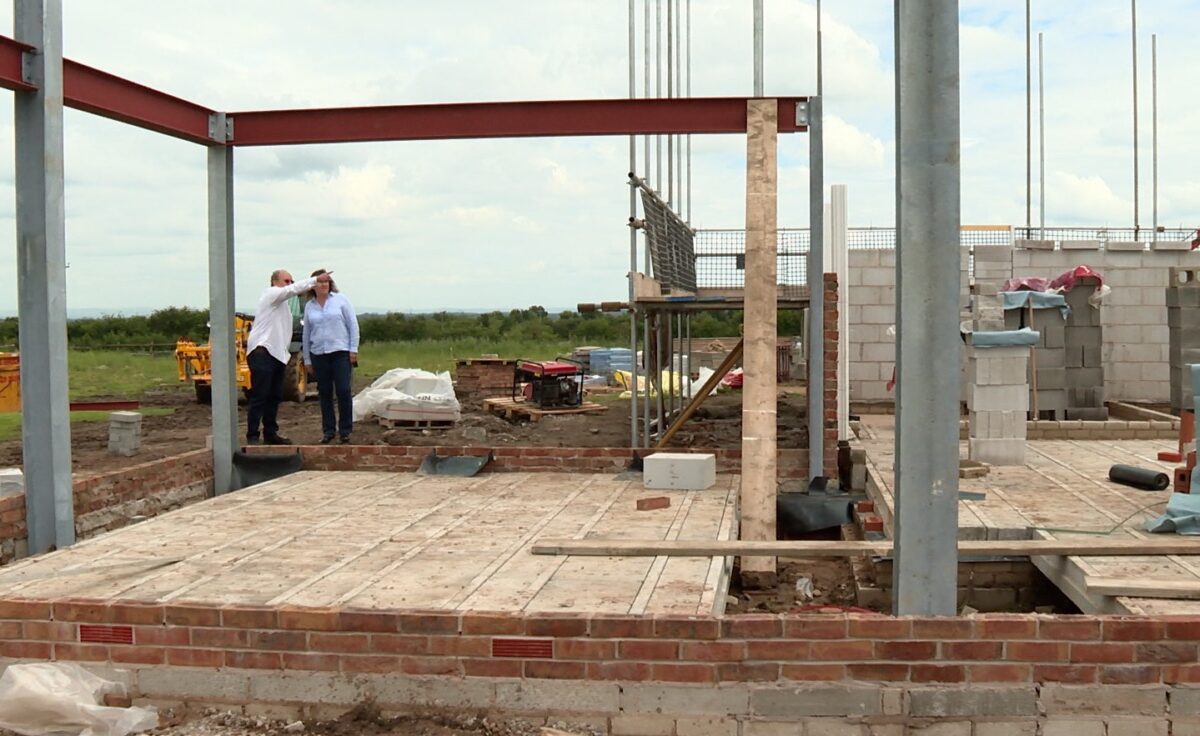
Now it’s time to begin the construction phase of your self-build project in earnest. Once the footings have set, you’re ready to build the substructure. There are several ways of doing this and a number of variations. The two main types are either via a solid concrete slab or block and beam.

Now it’s time to begin the construction phase of your self-build project in earnest.

The substructure of a self-build

Once the footings have set, you’re ready to build the substructure. There are several ways of doing this and a number of variations. The two main types are either via a solid concrete slab or block and beam.

A solid slab is generally the cheapest option in terms of materials but it probably requires the most amount of work and takes the longest time. The space inside the outer blockwork is filled with compacted hardcore and a layer of sand. The damp proof course (DPC) is installed on top of this, to prevent damp getting into the building and then the concrete slab is poured. After superstructure the slab is covered by an insulation layer and a floor screed tops it off, ready for a floor finish. Any ducting for services, such as underfloor heating, needs to be installed before the concrete slab is poured.

A block and beam floor is quicker to build, being dry laid. It may be the most appropriate choice, particularly in areas of poor soil quality or where tree roots have to be taken into consideration. After the footings are poured and the external walls up to the DPC are built, a suspended floor, made from precast concrete beams, is laid. The gaps between the beams are filled in with foundation blocks, creating a single flat slab. After superstructure the block and beams are covered by an insulation layer and a floor screed tops it off, ready for a floor finish. As with the solid slab, the ducting for any services needs to be installed before the screed is poured.

The superstructure of your self-build

The next part of the process is the assembly of the outer shell of the building, with interior and supporting walls, floors and topped out with the roof structure and covering. It’s now that the project really starts to take shape.

There are several different construction methods, such as timber framed, but the vast majority of new-build projects use brick and block. For this traditional building method, there is usually an inner skin of blockwork, with an outer skin of facing bricks. If the external finish to the walls is to be rendered and painted, then the outer walls can be constructed in blockwork too.

You’ll have chosen your facing brick in advance, from the dozens of variants available. The thermalite blocks look heavier than they actually are, as the porous design is meant to limit thermal conductivity and consequently, heat loss through the external wall. They can also be drilled easily and even sawn in half. The walls will be a cavity construction, which will allow an insulator, such as mineral wool, to be inserted at the construction stage. Bricks and blocks will be bonded with mortar, which sets solidly in 24 hours. Wire or plastic ties will need to be inserted every few courses, to hold the two skins of brick and/or block together.  

An inspector calls – building inspector visits

At various stages in the project the Building Inspector will visit the site, to ensure the work is being carried out to Building Regulations. We’ve already seen that they need to visit the foundations prior to the concrete pour. They may also need to see the floor and ceiling joists, to ensure they are in accordance with the approved drawings. They may also want to check the construction at roof height and the thermal and sound insulation, to make sure it is of the correct type and thickness. In general, as any queries with the design arise during construction, the inspector will be on hand to visit and discuss solutions with your construction team.

As the building grows and the walls gain altitude, a series of lifts of scaffolding will be required – each higher than the last. This will enable the operatives to work safely at height. Bricklayers will continue with the superstructure brick and blockwork, constructing any gable ends and chimneys in the process. Masonry finishes at eaves height, where the walls finish and the roof structure will begin. Lintels and flue liners will also be needed to be in place for any fireplaces and flues to be included in the design.

At higher levels, floors will also need to be formed, to create storeys to the building. Joists can either be built into the blockwork inner skin, or suspended on hangers (metal brackets fixed to the wall). Timber joists will be laid to centres and in some houses they may be visible – this is the distinctive beamed ceiling you see in older properties, but newer extensions and new-builds can include them too.

Easi-joists are a comparatively new alternative to traditional timber joists. They are parallel chord trusses, which are plated together with a metal web. The combination of the lightness of timber with the strength of the metal web means floors can be designed with a larger span and improved damping and stiffness characteristics too.

The timber staircases giving access to any upper floors will need to be constructed and installed as well. 

The sky’s the limit – completing the superstructure

The wall plate is a horizontal timber at the top of the building that runs along the top of the wall. It’s bedded in mortar and secured to the inner skin of the construction. It is where the roof construction sits and evenly distributes the roof weight across the entire structure.

Roof structure

The roof structure can be built from components, such as spars and ridge, called traditional roof – hand built – or they can be lowered into place with lifting gear (or manhandled) if they are pre-made trusses. The spar ends protrude beyond the outer face of the brick or blockwork, forming the eaves of the building – a fascia will sometimes be fitted to the spars, which the guttering can be fixed to. 

The whole timber roof structure will be covered with sheets – this is roofing felt, or a synthetic substitute, which is held in place with wooden battens, to provide waterproofing and to allow breathing. The roof is now ready to be tiled or slated.

If you have always dreamed of building your own home, contact us to find out more about our complete turnkey self-build solution for your self-build project.

The Self-Build Guide Design: 3. Renewables

Nowadays, when you build your own home, the demands of building regulations are such that a good standard of energy efficiency will always be achieved. This should be true whether you are building a traditional, contemporary or ‘hybrid’ house design.

Self-building and energy efficiency: the ‘fabric first’ approach.

Nowadays, when you build your own home, the demands of building regulations are such that a good standard of energy efficiency will always be achieved. This should be true whether you are building a traditional, contemporary or ‘hybrid’ house design.

Whatever the style, to make your home as energy efficient as it possibly can be, you need to make sure it will lose the minimum amount of energy in the first place by increasing its insulation and airtightness. Modern regulations have set a very good standard for insulation and are pushing for further improvements. Sealing up gaps and making sure there is no cold bridging in places such as between the bricks and the windows will make a big difference to the amount of heat that is kept in.

If near total airtightness is achieved, air becomes stale more quickly. To compensate, you can look at MVHR. This is a system of vents to aid ventilation and heat recovery that warms the incoming cold air with the heat from the outgoing stale air, achieving a consistent ventilation rate. The heat recovery ‘box’ itself is about the size of a small fridge and the filters will need replacing regularly to ensure optimum performance.

By adopting this ‘fabric first’ approach, you will be able to optimise the design of the building itself as far as you can. Once that’s done, it’s time to think about your energy supply, what it will be and how it will be sourced.

Energy efficiency in heating solutions

Heating contributes about one third of the country’s carbon emissions. As well as emitting high levels of carbon when they are burned, fossil fuels are also fast running out. From 2025 installing gas boilers in new build properties will be banned in new homes.

Building in the countryside

Your self-build may well be a rural retreat that is in a small hamlet with no gas supply. With oil fuelled boilers being phased out, an LPG tank for gas can be the answer instead. It is also possible to use BioLPG, which is produced from LPG waste, as a renewable and more sustainable alternative.

A biomass boiler can be a popular choice for an environmentally aware self-builder. These run on wood pellets or logs. It’s worth bearing in mind that these are large units, about twice the size of a gas boiler. You need to remember that some maintenance will be required and you need to allow for storage space for the fuel supply too.

A heat pump might be an option

Graham Sime, Director of TSPEC, a xrenewable energy specialist, says, “These systems use air temperature or closed loop ground heated fluid, to heat domestic hot water and heating systems via heat exchangers to reach controlled temperatures up to 75 degrees if needed. Heat pumps also reduce your CO₂ as there are no emissions.  In addition to the savings, there is also the Ofgem operated RHI scheme. This offers households an investment support scheme, which will give you a payment every quarter for seven years based on the heat load of your home.”

A heat pump box is straightforward to camouflage and can easily be sited outside on a blank side of the house where it is unlikely to be overlooked or spoil the exterior appearance of the property.

In extremely cold weather, a heat pump can struggle a little. A combination of underfloor heating downstairs and a few radiators upstairs, which will rarely be used, is a popular choice for many self-builders. Underfloor heating does not require such high temperatures as radiators do, which increases fuel efficiency. The heat stays at ground level where it will be most appreciated. There is no doubt too of the aesthetic appeal of uncluttered wall space that underfloor heating allows.

Hydrogen for the future?

Out of all the alternatives to natural gas being investigated, it looks likely that the future for heating most homes in the UK lies with hydrogen boilers. Hydrogen is a highly efficient fuel. When it burns it does not produce carbon, just water and heat. Significantly, a hydrogen network could use the same pipelines, fittings and boilers as natural gas. This means the existing gas network could be used, rather than the whole infrastructure having to be replaced.

Major manufacturers are working on hydrogen ready boilers, which will work with natural gas but can be switched over in the future.

Solar power

Solar power is becoming more and more popular with homeowners as a way of saving on their energy bills, increasing energy efficiency and producing their own power.  UV panels harness the sun’s rays to become electricity.

According to one of our architects, Russell Baker, one of the main issues that holds back many self-builders from incorporating solar panels is a question of aesthetics. To be most effective, panels need to be between south east and south west facing, which may well mean they are at the front of the house.

Russell says, “Solar panels are increasingly efficient but in many cases still do not look very aesthetically pleasing. This can be an irritation if you have spent both time and money making sure your new home will blend in beautifully with its surroundings. An alternative is solar roof tiles by the likes of Tesla.  They cost more but do look much better, thanks to the slate grained appearance and the way they are fitted to reach all the way to the edge of the roof.”

In some cases, customers can earn money back by selling excess energy to their suppliers. Including solar power in your self-build could make a difference in the long run to your energy efficiency and national grid savings.

Graham Sime says, “There are many innovative ways to utilise and maximise the use of the free electricity a household generates. Simple solutions such as immersion control to supplement hot water production are very commonplace. Battery storage, which minimises grid consumption day and night, is ever increasing in popularity. Further advances in technology now even enable you to directly charge your hybrid or electric car from the PV panels with fast charge capability up to 32A.”

Electric car charging points

The UK’s car charging infrastructure is growing rapidly. There are thousands of public car charging stations around the country. An estimated 80% of car charging happens at home and electric charging points are already being fitted at many new build homes.

Talk to the professionals about energy efficiency

Incorporating renewable technology will add a certain amount to the price of self-building your home. When you are doing price comparisons, it is important to remember to include costs for any ongoing maintenance that is likely to be required, rather than just considering the installation costs.

When you are planning your self-build project, it’s important to talk to your architect and contractor. Share your thoughts on what you want your home to achieve regarding energy efficiency, while keeping within your budget.